Monday, October 10, 2011

Taco Time

So, any excuse to bust out my new tortilla press, and I am ALL over it!!  I found a bag of Masa corn flour in the grocery store a while back, and decided to attempt home made corn tortillas.


The only problem was that, at this time, I did NOT own a tortillas press.  We (L, and myself) decided we could hand roll them... (heh, heh). WELL.. we did hand roll them, which was a giant pain in the asparagus, BUT they tasted so flippin AMAZING that I vowed to pick up a press next time I saw one...

Fast forward a month or two... Thank you, Kathy, (my Chili Cookoff friend)! I now have a $9.99 Tortilla press, and can make beautiful shaped tortillas like the ones in the pic below:


SO, last Saturday was lunch with an old friend, and instead of meeting up at Garden Grill (our usual) I decided to make us a Mexican Lunch at home.  I went a bit overboard, as usual, and made enough food for an army. Thankfully L joined us for lunch too, so my spread did not look SO ridiculously abundant for two.

Menu
Salsa de Arbol from the El Paso Veg Snob's blog
While browsing all the new and exciting Vegan Mofo posts, one can get slightly overwhelmed.  I saw this salsa post and was intrigued by the used of dried Arbol chilies (I have a big bag of them in my pantry and they are nice and spicy)! The directions stated 4-9 dried chilies. Not wanting to use the mere minimum, but not sure if my guests would be up for NINE chilies, I split the difference so-to-speak and went for five.  Good stuff! A nice, simple, tasty and fresh salsa with just the hint of spicy kick.

Cashew Crema from Viva Vegan!
I don't know why I haven't tried this sooner, what a complete and utter FOOL I've been.  I occasionally buy Tofutti sour cream, and have dabbled in making my own vegan sour cream varieties, too.  But I tell you Terry's Cashew Crema blows them ALL out of the water!!  It's so thick, rich and tangy, absolutely perfect for topping any part of a Mexican feast!  My omni better-half is a die hard sour cream fanatic.  SO much that, when I order a dish out in a restaurant that comes with sour cream, I have them leave it OFF my plate and give it to her.  Needless to say, sometimes the dairy free sour cream options are less than impressive to someone who is looking for the actual "cream" that is sour cream.  Tofutti works okay... but I like home made stuff, and so far my attempts at tofu based non-dairy sour creams have not quite lived up to her expectations...

THIS ONE DOES!  It is GORGEOUS!! ^_^

Photo & Video Sharing by SmugMug

I mean, just LOOK at how lovely and thick it is.

I was fortunate enough to see Terry do a cooking demo at the Worcester VegFest, and the beloved Cashew Crema was featured on top of her CHIPOTLE, SEITAN, AND POTATO TACOS, which we all got to taste (my favorite part)!


CILANTRO LIME RICE:  I'm a big fan of serving rice alongside of my Mexican meals.  I wanted something simple, yet flavorful, so instead of my usual recipe for Mexican Rice, which is a bit involved, I decided to try something new. 

Viva Vegan strikes again with CILANTRO LIME RICE! Terry's tip: "This rice works well with rice cookers"*SOLD* One less pan on the stove! I doubled the recipe, and used basmati rice because I love it so.  Threw everthing into my rice cooker and hit the start button.


I came out perfect! The lime zest and juice really add a great fresh flavor to the rice.  Stir in some chopped scallion and cilantro at the end, and you are good to go!

Saturday, October 8, 2011

Apple Tart: (or Forgotten Pie Crust; Best one Yet)

iPhone Pic
Sorry it's another apple dessert, but I'm getting my practice in for Thanksgiving!!

So, I had a few, lonley Honeycrisp Apples left from my Farmer's Market haul.  Not quite enough for a full blown pie, so I though an apple tart would show them off nicely.  I had bought an inexpensive tart pan a year or so back, which I have NEVER used. It even has fluted edges and a removable bottom; how very exciting!

I went back to my original pie crust recipe for this one, cutting in in HALF, because I just needed a tart 'bottom', with enough extra bits to fold over the edges.

Basic Flaky Pie Crust (Vegan)

1 1/4 cups unbleached all-purpose flour
1/2 teaspoon sugar
1/4 teaspoon salt
1/4 cup vegetable shortening
1/4 cup margarine, non-hydrogenated (I use Earth Balance)
1/4 cup ice water, plus 1 tbsp ice water as needed

Now, I don't usually commit to making pies on weeknights, but the urge was there, so I went with it.  I cubed up all my shortening and Earth Balance on a little plate, measured out my flour in a stainless steel bowl, and proceeded to place them both in the freezer to chill, as I always do.  And then, fell asleep...

I woke up, slightly dazed, and decided that the crust ingredients would be fine in the freezer until tomorrow, and went to bed.  And they were.  Next day after work, I figured I'd better make this bad boy, so I pulled out the butter and shortening cubes to let them thaw, so as not destroy my food processor when I pulsed.  The dough came together nicely. So, I scooped it out into a disk, wrapped it in saran wrap and placed it in the fridge to chill for 40 mins. And then, my urge to bake a tart had suddenly left...

"Well, the crust is done, and ready to go," I thought.  "I'll just bang this thing out tomorrow when I'm fresh."

Okay, THURSDAY night after work (I started this on Tuesday...) THURSDAY, I came home from work, determined to have apple tart made, come hell or high water! I pulled my 'crust disk' out of the fridge to get the chill off before I rolled it out. I peeled three (3) apples, sliced them with my apple slicer and THEN cut each slice into 4, to make beautiful, thin pieces.  The crust rolled out like a dream.  I think I let it get a bit more room temperature than normal, which is odd because I am usually paranoid about the crust getting too warm.  Perhaps, that is part of my problem... rolling the dough out too cold(?!)  Anyhow, the crust fit nicely into the tart pan, with just enough hanging over to fold. But I felt the fat melting a bit, so I put the crust into the freezer while I finished preparing the apples.

I read a couple of different tart recipes online where the sugar and spice were sprinkled over the apples after they were arranged in the tart pan.  So, I went to work arranging my little apple slices in co centric circles, overlapping each other, working from the outside, in.  I then sprinkled them with 2 TBSP of sugar, about 1 tsp of cinnamon, and then a few shakes of Cinnamon PLUS from Pampered Chef (cinnamon, nutmeg,  allspice and a bit of orange peel).  I folded the edges of the crust over onto the outer edge of the apples, and brushed the entire top with 2-3 tbsp of melted Earth Balance.  For an extra, special good measure, I also sprinkled the crust with extra sugar and cinnamon.

Bake your lovely tart at 400 degrees for 45-50 minutes.  Many of the tart recipes online also had the last and final step of glazing the top, right out of the oven, with a type of jam or jelly.  I had in the fridge, a jar of Holiday Jam, from Stonewall Kitchen, which is a mixture of pear, cranberry and raspberry with a hint of orange. I thought this fit the bill nicely, and the jar was almost done.  So I nuked what was left in the microwave, about 2 tbsp, and brushed the top of the entire tart before it cooled.

I don't know if it was freezing the butter/shortning cubes overnight, letting the dough rest in saran overnight, putting the rolled dough in the freezer before I baked it, or dousing the whole top in Earth Balance, but the crust on this tart was one of the BEST I have ever made OR tasted.  So flaky and delicious, and omni-approved; it absolutely melted in your mouth.  My boss at work, (the Martha Stewart of cakes and baking I call her) even asked for the recipe.  And, my mother requested this tart (not apple pie) for Thanksgiving.  Well, hey, I'll take it... Impressing people with vegan treats always puts a smile on my face ^_^

Thursday, October 6, 2011

Smoothie To-Go!


Been cooking a lot of food lately... And I mean A LOT! This Vegan MOFO is kicking my but, and I have enough leftovers in my fridge and freezer to last me all Winter.

Some days, you just need to start off with some raw liquid sunshine!

Here we have:
1/2 of a Honey Crisp Apple (peeled & cored)
2/3 of a ripe frozen banana
1 cup frozen Mango  (Trader Joe's)
1/2 tsp cracked Flax Seeds
Fresh Orange Juice to cover

Blend until smooth!  Pour into jar (above we  have a clean, de-labeled Veganaise jar), screw on the lid and your are ready to hit the road. ^_^

Wednesday, October 5, 2011

Cheezy Artichoke Crostini

Creamy Artichoke Crostini


PPK Cookbook Challenge Week Three: Colleen Patrick Goudreau


Since the folks over on the PPK website are cooking from Colleen Patrick Goudreau's cookbooks, I decided to take  some inspiration from them and follow suit.

Although I do have Joy of Vegan Baking and Vegan Table, this dish was inspired from Color Me Vegan.  Colleen was nice enough to post some sample recipes here, on her website.  For the dish above, I used the cashew cream part of the Black Olive Bruschetta with Cashew Cream.  Since I had no black olives on hand, I decided to mix in a can of artichoke hearts instead.  I then added some extra garlic and nutritional yeast to give it a bit more cheezy artichoke dip flavor.

Ingredients

1 cup raw cashews
1 tablespoon olive oil, plus additional oil for brushing
1/2 yellow onion, finely chopped
1 teaspoon miso (white or yellow)
1 tablespoon lemon juice
1 tablespoon water
1 -2 garlic clove, minced
1 -2 tablespoon nutritional yeast
salt and pepper, to taste
1 (14 1/2 ounce) can artichokes, chopped
1 baguette, sliced
fresh chives, minced, for garnish

Directions
  • Soak the cashews overnight in just enough water to completely cover them. The next day, drain and rinse the cashews, then set aside.
  • In a medium sauté pan, sauté the onions in the 1 tablespoon of oil until translucent and tender, about 5 to 
  • Place the soaked cashews, sautéed onions, miso, lemon juice, minced garlic and water into a blender and process until smooth.
  • Mix in the chopped artichokes, and nutritional yeast, salt and pepper, to taste.
  • In the meantime, preheat broiler to high.
  • Brush the baguette slices with a light layer of olive oil and broil for 2-4 minutes, watching closely to not burn.
  • Top each toasted slice with 1-2 tbsp of the cheezy artichoke spread then sprinkle with chives.
Creamy Artichoke Crostini

I was fortunate enough to hear Colleen speak at a book signing here in little Rhode Island.  I actually found out about it by accident, but had time to rush down to the Barnes & Noble in Warwick with my books to get them signed!  I have listened to her podcasts many times, and I must say, she is EVERY bit as inspiring and enthusiastic about veganism in person ^_^

Tuesday, October 4, 2011

Oh, Smoky Curls, You are Shamefully Addictive

Photo & Video Sharing by SmugMug


I would almost have to say:  It is a sin how good these are...  Perfect for Sunday Brunch, next to a huge stack of pancakes.  And don't even get me started on how amazing these are on whole wheat toast slathered with Veganaise, lettuce and tomato...


If you don't have Vegan Diner by Julie Hasson, run to your nearest bookstore and buy it!!  I have this cookbook on my Nook Color, and I have to say, every recipe I've tried so far has been a winner!  Google books just so happens to have a sneak peek of the Smoky Soy Curl recipe here, if you'd like to check it out.

So, Soy Curls... 

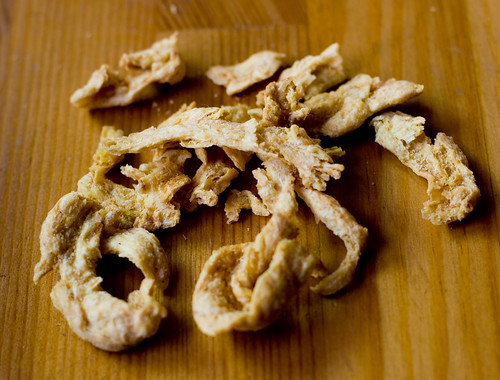
When dry, they kind of remind me of shriveled up witches' fingers  Not very appetizing, I know, but when re-hydrated, these little babies take on a life of their own!  Soy Curls are not sold in stores anywhere in Rhode Island, so I decided to order me some bags to keep in the pantry.  I ordered quite a few... but the price was better the more you bought!!  They also threw in a container of their Chickn Seasoning too, (kewl)!

The beauty of the soy curl is two-fold. 
ONE: although they are technically a processed soy product, Soy curls are actually made from certified Non-GMO, WHOLE soybeans, grown without chemical pesticides.  Many of the vegan "meat" products on the market today are made with “soy protein isolates”. These protein isolates are obtained through a rigorous chemical process, often using the chemical hexane, where the soy protein is actually separated from the fat of the soybean.  Thankfully, soy curls leave this chemical bath behind when making their product
TWO: Soy curls have no FLAVOR, whatsoever. Which gives you, the cook, the power to impart any flavor your heart desires!  The suggested method of re hydration from the Soy Curls website is plain ol' boiling water. I always thought that was a little pedestrian, considering there are so many broths and spices one could use to infuse flavor RIGHT into the curl!  I'm thinking something more like veggie broth, a splash of soy or Bragg's, some sage, thyme or rosemary, onion powder, garlic powder...something!

Photo & Video Sharing by SmugMug

That's what makes Julie's recipe so great.  The curls are re hydrated in a mix of water, soy sauce and LIQUID SMOKE, the vegan equivalent of smoky, bacon-flavored goodness!  These smoky curls can be whipped up, marinated, and sauteed to a crispy-sweet and smoky goodness in about 15 minutes.  Julie's recipe, as written, makes an abundance of smoky curls! 

I have about a third of them leftover, and am going to attempt a Pasta Carbonara.  Will let you know how it goes!  If I can pull it off, my meat-eating better half will be MINE foreverrrrr!!  ^_^

Monday, October 3, 2011

One More Eggplant Triumph!

Fellow eggplant haters, are you still with me?!

Today I have one more delicious recipe that utilizes my (I guess we could say 'former') arch nemesis, the Eggplant.


Roasted Eggplant Spread
(adapted from Ina Garten, Barefoot Contessa)
 I 've never gone wrong with veganizing any of her recipes, and this one was actually vegan as written!

Ingredients
1 medium eggplant
2 red bell peppers, seeded
1 red onion, peeled
2 garlic cloves, minced
3 tablespoons olive oil, divided
1 1/2 teaspoons kosher salt, or to taste
1/2 teaspoon freshly ground black pepper, or to taste
1 tablespoon tomato paste


Directions
  • Preheat the oven to 400 degrees F.
  • Cut the eggplant, bell pepper, and onion in half.
  • Spread them face down, along with the garlic, on a baking sheet and drizzle with a bit of olive oil and salt and pepper. Roast for 45 minutes, until the vegetables are lightly browned and soft, flipping once during cooking.
  • Cool slightly.
  • Remove the flesh from the eggplant, and the seeds from the peppers. 
  • Roughly chop and place the vegetables in a food processor fitted with a steel blade, add the tomato paste, and a tbsp of olive oil and blend. 
  • Pulse 3-4 times for more texture, or blend until smoother, your choice.  I blended mine a bit more smooth.
  • Taste for salt and pepper.
*If you have jarred roasted red peppers on hand, those work great in this too!!

This dip has a wonderful roasted flavor and tastes amazing.  The roasted red pepper and the tomato paste add a fresh Mediterranean flavor to this.  Fresh oregano or basil would be a nice addition as well.  This dip is great spread right on plain bread, pitas, crackers, use it as a sandwich spread OR make mini pizza bites!

Photo & Video Sharing by SmugMug
iPhone pic :P

Fresh baguette topped with eggplant spread and a sprinkle of Daiya Mozzarella, baked at 450 for 10-15 minutes.

Now that I have given eggplant a second chance, (and have actually found some new ways to enjoy it), I thought I'd look up its nutritional benefits:

"Eggplant is also an excellent source of dietary fiber, which can help protect against colon cancer and keeps the digestive system regular. The vitamins in eggplant consist primarily of vitamin A (in the form of beta-carotene), B vitamins, folate and vitamin C. Eggplant is also rich in minerals, boasting a large quantity of potassium, magnesium, calcium and phosphorous. With no fat, six carbs and 27 calories in a 1-cup serving, eggplant makes an excellent addition to any diet".
(From livestrong.com)

(B vitamins, huh? How great is that?!)
So there you go!  Eat  your Eggplant! ^_^

(I will post something other than eggplant tomorrow, I promise)


Saturday, October 1, 2011

Confessions of an Eggplant Hater

Haters gonna hate, and let me tell you, my distaste for these squat, purple little vegetables runs quite deep. Who's with me here?!?  I've had more soggy, mushy, bitter skinned eggplant dishes in my lifetime than I care to count.  And, don't even get me started on the SEEDS.  There's nothing worse that biting into a perfectly crisp, fried eggplant sandwich, only to find yourself with a mouthful of bitter seeds... blahhh!!

So when my friend brought me over a cute little eggplant that she grew herself in her garden, I was less than enthused.  How can I possible make this into something I'd actually want to eat?!
Garden Eggplant!

So falafels came to mind, (as they so often do), and I thought I'd try my hand at some Baba Ghanouj

Baba Ghanouj - Middle Eastern Eggplant Dip

Baba Ghanouj - Middle Eastern Eggplant Dip

1 eggplant (1 medium or 2 small)
2 garlic cloves, minced
1/4 cup lemon juice, fresh
1/4 cup tahini
1/2 teaspoon salt
1/2 teaspoon ground coriander
1/4 parsley, minced
black pepper, to taste
1 pinch cayenne (optional, bu I like a little spice)

For garnish
olive oil
parsley


Directions:

  • Preheat oven to 350.
  • Line baking sheet with foil and spray lightly with non stick cooking spray.
  • Slice eggplant(s) in half lengthwise, and place face-down on baking sheet.
  • Bake for 30-45 minutes, or until very tender.
  • Cool until comfortable to handle.
  • Scoop out the eggplant flesh and discard the skin.
  • Place in food processor with garlic, lemon juice, tahini, salt and coriander.
  • Puree until smooth.
  • Add minced parsley and pulse to combine.
  • Pour into bowl, check for salt, add pepper and cayenne (if using).
  • Chill for half hour, or until ready to serve.
  • Top with a drizzle of olive oil and some parsley.


I served this as a spread on homemade falafels, and had the leftovers with pitas. ^_^